Showing posts with label Super Thrifty. Show all posts

Tuesday, February 22, 2011

Toddler Activity: Itsy Bitsy Spider Gloves


I have been trying to come up with some fun ways to play with my busy toddler, these itsy bitsy spiders were a huge hit! Be sure to make a pair for you too!
I got the idea from the nursery at church, only they used pom poms to make theirs. I didn't have big pom poms so I decided to make my own spiders from fabric I had. For the spiders head I traced the cardboard circle from an empty spool of ribbon onto the fabric. For the body I used a large lid from a hot chocolate container as my template. I just cut my circles and did a running stitch around the edges, stuffed with batting and pulled it tight. Then I sewed (ok, I really hot glued) the head and body together and then on the gloves (which I found at target two pair for $1.5o). Then I just glued on some googly eyes. She loves it!

One of her other favorite activities is scattering the DVDs everywhere!

Monday, January 17, 2011

Crepe Paper Rose Heart

Using THIS tutorial to make the crepe paper roses, I made this to add to my small (but growing) collection of Valentine decor.

Sorry the picture isn't even straight or even decent quality! I really need to get a clue when it comes to photography!
(those wooden blocks were at target for $2.50)

I got the frame from the DI for 50 cents, the scrapbook paper I had on hand (thanks Shaela) and the crepe paper came from the dollar store. $1.50 for the total cost.

I just took out the glass in the frame made the roses until I had enough for the heart and hot glued them onto the paper which I had already cut and modge podged to the back of the frame. Easy!

Using the same tutorial, I also made this wreath for my daughters door. I got the wreath at the dollar store and used 2 rolls of crepe paper @ 50 cents each from the dollar store. $2 for the total cost, but it was a little time consuming!

Thursday, February 4, 2010

Fabric Rolled Roses


These are so fun, quick, and easy! You can make just about any kind of accessory with them. Tonight I made this simple necklace for me and I think tomorrow I will do some hair clips for Eden! Alayne Studio has a great tutorial HERE.

Monday, October 19, 2009

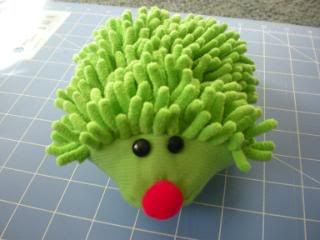
Dollar Store Hedgehog

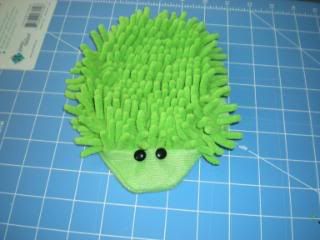
I saw this super cute idea a while back and just got around to trying it out! It's a hedgehog made from a car washer mitten from the dollar store! I looked and looked and could not find the original tutorial to link to so I did my own tutorial. If this was your idea please let me know so I can link to you!!

Update: Here is where I found the idea and from there you can get to the original tutorial. Enjoy!

To make your hedgie you will need
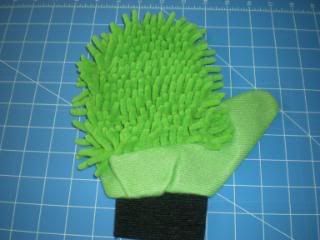
-1 car washer mitten from the dollar tree
-two buttons for eyes
-1 pom pom for nose
-batting
First take your car washer mitten and....

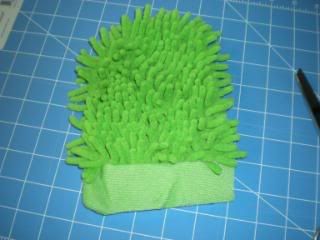
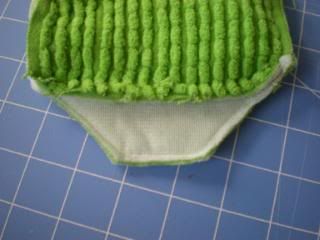
Cut the black part off as well as the thumb, you will want to leave a little extra material when cutting the thumb so you will be able to sew it shut when the time comes

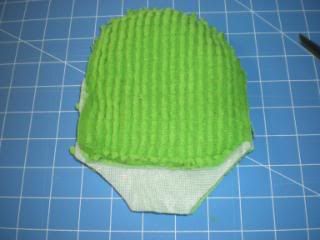
Turn your mitten inside out and cut two diagonal lines as shown below

Sew it using your machine lining it up with the foot. Do not sew the thumb hole shut yet!

Very carefully turn it right side out through the thumb hole and sew the eyes on

Stuff with batting and hand sew the thumb hole shut. Sew on the nose securely! TaDa! You have a super cute, easy, hedgehog for a dollar!

Monday, October 12, 2009

Cute Spider Decorations

These are fun Halloween decorations that your kids can easily make! You just need black fuzzy... I think they are called pipe cleaners? Well anyway you know what mean by the photos! And if you want them to be super cute, you will need some google eyes and hot glue! They are very easy to make:
Take 4 pipe cleaners and line them up next to each other
Bend them all the way around at the middle (kind of twist like a twisty tie)
Arrange the legs, make a knee and foot for each leg
Glue on google eyes if desired!
Decorate!
On lamps


Outside

Without google eyes for extra creepiness!


Monday, October 5, 2009

Alphabet Lids!

Eden loves playing with baby food jar lids! I thought it would be fun to save a bunch of them and put all the letters of the alphabet inside for when she gets a little older.

Here's what I did:
I traced a lid on some cardstock paper
I cut out all the circles (26 of them) and wrote the letters on each one
I pushed the circles down into each lid, it should fit nice and snug and be very hard to get out
I covered a formula can with scrapbook paper to store all the alphabet lids in

I think I will keep saving lids so I can do numbers and shapes too. I think when I do the shapes I will make two of each one so they can also be a memory game!

Monday, September 28, 2009

Baby Legs

I was at the dollar store a few months ago and I spotted these adorable striped scarfs! I thought "too bad those aren't tube socks, they would make the cutest baby legs." It never dawned on me to actually sew them into baby legs! I'm so creative huh?

So, I forgot about those cute scarfs until today when I found this GREAT tutorial on obsessively stitching. She teaches how to turn those exact adorable dollar store scarfs into baby legs!

I don't have a serger but I was able to do the tutorial the exact same except instead of serging I zig-zag stitched, I went around each end twice and I made the stitches short. I think it worked well!!


So cute!! I think I am going to have to make a pair out of every color scarf they have!

I added the cute flower bow Eden is wearing to the boutique today!
I am going to be doing some more in different colors soon hopefully!

Thursday, September 24, 2009

Little Apron

This is sooooo easy and fun! It's a little apron made from a place mat! Of course Eden wont be able to use this for a few years but it was only $1 to make and I can save it for her! I got the idea and tutorial HERE on dollar store crafts!

Friday, September 11, 2009

Hooded Bath Towels and a FIRST!

Don't you love the idea of hooded bath towels for babies? Don't you hate the ones you buy at the store that only last for maybe 3 months before your baby out grows them?? I was sooooo pleased to find an awesome, simple, tutorial at Green Apple Orchard HERE. Like I have mentioned before, I am a beginner when it comes to sewing so I was excited when I saw how easy a project this was. I got my towels and wash cloths at wal-mart on clearance. The big towels were only $2.00 each and the wash cloths were only $1.00 each! Yah!! I made two and love how much more functional they are compared to those tiny baby hooded towels!


My mom was in town this past week and she helped me make a jumper for Eden! This was the first time I have ever sewn something like this. My mom helped me follow the pattern and basically told me what to do! This pattern had "easy" on the cover and after doing it with help, I just might be able to make another one all by myself, just maybe!

Wednesday, August 26, 2009

Baby Shower Idea

A friend from my ward is having a baby girl soon! This is what I came up with for her baby shower gift! It was super easy and it works as a bow holder!

Wednesday, August 19, 2009

Cloth baby rings

I found this great tutorial on make it and love it for cloth baby rings. I was a little worried at first because I am not the best at sewing, but I am trying to get better so I thought I'd give it a shot! I'm glad I did because it ended up being pretty easy and only took about an hour to do both sets! I do need to get some cuter fabric though! There is no place to get cute fabric in Vegas! Does anyone know any good places online to buy fabric at a good price? I guess the important thing is Eden loves these!! They are going to be part of her quiet toys for church!

Monday, August 10, 2009

Headband Holder

I have a ton of these cute lace headbands with bows made out of sheer ribbon attached to them. I learned the hard way that these do not do well shoved in a box with the rest of my headbands! Last night I finally came up with a solution for storing them.
I took an old formula can, the tallest one I had, then I took the label off. I'm sure you can guess what I did next!

Covered it up!!
To cover it I just cut out a piece of material the same size as the can, then I took the lid off and lined the edge of the fabric to the very top. I used hot glue around the top and bottom edges. Any fabric I had hanging over the bottom edge I just folded under and glued to the bottom of the can. I also covered the top part of the lid with fabric just by tracing it, then I lined the edge of the lid with ribbon. You could also use scrapbook paper with mod podge to make one of these.

Here is what it looks like with all the headbands on it. You can also store any non-fragile headbands or anything you want inside the can!

I still had more headbands so I am going to take this smaller can and cover it with different fabric that matches and stack it on top! But I need to find the perfect fabric first!

Saturday, July 18, 2009

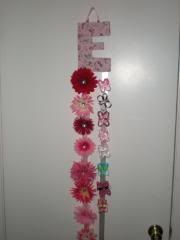
Another Bow Holder Idea

First, thanks to those that suggested I sell the tutus at my boutique. I made some to sell today and I just posted them! Let me know what you think. And don't worry, I am saving my extra poofy one for Eden's birthday!
Since I have decided to start selling hair bows it seems I am running out of room to store them! I have a simple, cheap, idea for another bow holder and I thought I would share.

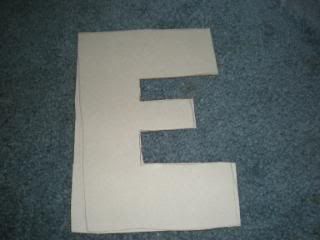
I took some sturdy cardboard, traced and cut out the letter E (for Eden)
Apparently I have a hard time cutting within the lines.

Then I took a square of some cute fabric I got on clearance from Wal-Mart and mod podged it to my letter.


Then I cut around my letter leaving a little extra fabric so I could mod podge the edges to the back.
Then I hot glued some ribbon to the letter! I used the gift wrapping kind so I wouldn't have to use up my bow making ribbon!

Wednesday, June 10, 2009

FRAMES!!!

There are so many neat things you can do with picture frames other then the norm. Here are some of the ways I have put those frames I had just laying around in my garage to good use!

First, I saw this way cute idea on make it and love it. It's a dry erase board! For my family it's our new grocery list! I don't think I ever realized you can use dry erase markers on glass like that but it does make sense! I love the idea of having such a cute grocery list only I thought it would be nice to make it a magnet to hang on the fridge. So I just took an old frame and added some cute scrapbook paper that would match with my kitchen and came up with this...

Then on the back I just added some old magnets we had laying around! It holds well, but keep in mind the frame is cheap and very light weight!

I spent 59 cents on scrapbook paper. I already had everything else, so this was a super cheap project!


Once again, I came across another cute idea on make it and love it! I know I already have a bow holder, but I had to try this one out! I didn't want to cover the frame with fabric, because I liked the frame a lot. So I just added some girly fabric with ribbon going diagonal.


Make it and love it is such a good blog! I didn't realize it until now, but I got this idea from that blog as well. We had this boring white board/cork board we purchased from the thrift store that really needed some help!

Before...

After...
Our office is so boring, what a perfect opportunity to add some color with some fabric I had been saving for something like this. I was lucky enough to have a frame in my garage that fit perfectly!
I also made some square thumbtacks out of the same fabric to match with a tutorial on how about orange. So after a little cleaning up and some color, I think it looks much better!

Monday, June 8, 2009

Homemade Laundry Soap

I am into saving money, but I didn't know I was capable of taking it this far! When people talk about this kind of thing I usually don't pay much attention. Homemade laundry detergent? It seems like homemade stuff like that would have tons of weird ingredients that I would never be able to find! But it's sooooo simple, I wouldn't be doing it if it wasn't! All you need is borax, washing soda and a bar of soap! You can get the borax and washing soda I'm pretty sure at any grocery store on the laundry aisle. I got mine at Smiths so I know they have it there for sure. Click Here for my favorite tutorial on how to make this stuff! You can also check here for other recipes, they all have the same ingredients pretty much, just different proportions. A few tips the first tutorial does not mention, you should have a lid for your bucket, and you need to shake or stir well before each use. Oh and this is good stuff, I like it a lot better then the cheapo detergent we had been buying! Good luck and if anyone makes it let me know how you like it!

Wednesday, June 3, 2009

StArBuRsT!

I saw this idea on HGTV and have been wanting to do it for some time. Its a starbusrt! The only problem is for this to be "cheap" the way I insist on, you need to use tinker toy you have laying around or that you find at the thrift store for cheap, if you buy tinker toy new it just isn't worth it because they are like $15-$20! So basically you just take tinker toy and build it like the picture shows.

Then you spray paint it (semi-gloss works best for this) I used brown because it matches my bedroom but I think it would be fun to do a multi-colored pink, green, and brown one for Eden's room, be creative! Then hot glue little mirrors around it and one in the middle. Very simple!

Tinker Toy: $1
Spray paint: $ 1.12
2 packages of mirrors from Michaels: $3.24
Total cost: $5.36

Wednesday, May 20, 2009

Cover it up!

I love covering things with fabric remnants/ribbon/paint! Some of my favorite things to cover are cardboard boxes for storing things. I always check the local thrift stores for fabric and I have been quite lucky!! I have found yards of several kinds of fabric bundled together for a dollar!
Here is a cardboard box I covered with some fabric from the thrift store, it's a nice for storing toys and fits perfectly under the crib!


My baby ended up with a TON of recieving blankets, she has outgrown them all anyway so I used a few of the ones that match her bedroom to cover up..

a thrift store storage box
and some shoe boxes
I know many of you have seen these wipe cases, they were pretty fun to make and easy. I use this tutorial HERE.
The one on the top was made with thrift store fabric and the one of the bottom was made with part of a receiving blanket!

This lamp was purchased at the thrift store for 2 dollars. It was just a plain, wood lamp when I brought it home. I wish I would have taken a before picture. After a some paint, ribbon, and little wooden circles, it was a perfect fit for the nursery!

We have built ins in our master closet so instead of crowding up our bedroom with a dresser we put those built ins to good use! I could not get myself to purchase storage bins for our socks and underwears however! They are too expensive when you need 4 of them! I of course got some cardboard boxes and covered them up with fabric and old sheets. Hot glue is one of my best friends!

Monday, May 18, 2009

Eden's Flower Clips

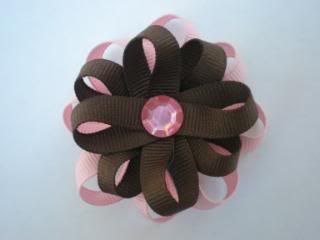
Flower clips are becoming more and more popular! They look adorable when clipped on crochet headbands for your baby, or clipped in any little girls hair! They are fun and so easy to make!

You will need:

-Hot Glue Gun

-Flowers
There is only one important thing to remember when buying your flowers, do not get the flowers from craft stores! They charge so much for them! Why pay that much when you don't have to? All the flower clips I've made have been made by flowers from the dollar store. You get several flowers for a dollar! There are different dollar stores depending on where you live, check several kinds. I have never found them at the 99 cents store but all the other ones have had them. It's so much cheaper and I think they still look great.

-Alligator Clips
The best place I've found to get your alligator clips is in bulk on Ebay. Try to find an auction that has the "buy it now" and "free shipping" options. I got 50 of them for 6.00 and that was with free shipping! If you only want to make a few clips you can get a 12 pack at Sallys, or I have even seen them at CVS. But it is much cheaper to buy in bulk.

and if you want something more dressy in the center...
-Rhinestones or you could also use different styles of buttons

For the rhinestones, use the 40% off one item coupon for Michaels that comes in your local paper, and I think it comes in the mail as well. I have actually found the Rhinestones at Michales to be cheaper then the ones at Wal-Mart, even without the coupon! And always always be sure to check your local thrift stores for any of these items. I found a giant bag of different buttons once for 50 cents!! That is what I've been using for some of my flowers!

To make the flowers:

-Take the flower apart (I usually do at least two, or you can mix and match)


-With a tiny dab, glue each piece together near the center.

-Glue your Rhinestone in the middle, if you want to keep the original center stick it back through the hole and trim the stem down so you can glue the clip on back.


-Glue your alligator clip on.

You're Done!