Thursday, April 14, 2011

Latest Projects

I have been in craft mode again! I feel so accomplished when I make something I actually like. Usually I hate everything I make at first, then after a few days I either keep hating it or decide it's not as bad as I originally thought.

I started a new picture wall using a bunch of frames I got at the DI and my silhouette for the vinyl.

I made this for our front room, I know it's very valentinsey so I might remove the vinyl hearts until February.

I am so excited about this year round wreath. My friend suggested we do it for a craft night and I'm so glad we did! It was kind of tedious but worth it. Burlap is pretty messy! We got the idea and tutorial from here.
I still have to make Halloween, Christmas, and Valentines but these are the ones I have done so far. Sorry about my picture quality, not sure why everything looks so foggy!!

St. Patrick's Day
Easter

July 4th

When there's no holiday near this one will be used.


Tuesday, February 22, 2011

Toddler Activity: Itsy Bitsy Spider Gloves


I have been trying to come up with some fun ways to play with my busy toddler, these itsy bitsy spiders were a huge hit! Be sure to make a pair for you too!
I got the idea from the nursery at church, only they used pom poms to make theirs. I didn't have big pom poms so I decided to make my own spiders from fabric I had. For the spiders head I traced the cardboard circle from an empty spool of ribbon onto the fabric. For the body I used a large lid from a hot chocolate container as my template. I just cut my circles and did a running stitch around the edges, stuffed with batting and pulled it tight. Then I sewed (ok, I really hot glued) the head and body together and then on the gloves (which I found at target two pair for $1.5o). Then I just glued on some googly eyes. She loves it!

One of her other favorite activities is scattering the DVDs everywhere!

Sunday, January 23, 2011

Paper Rose Wreath

I am so excited about this wreath. It took me about 2 weeks to make. Every night after I put the kids to bed, I would work on it for at least an hour. Cutting, rolling, and then gluing (my husband works full time and goes to school at night, I need projects like this to keep me busy) It was a bit tedious but worth it!

I found the idea for the paper roses here. I just got a cheap wreath at Michael's and wrapped some red felt around it, just so it's red underneath and will blend (I had some on hand, you could also do ribbon, spray paint, colored tape, yarn.... etc...) I used construction paper from Michaels for the roses. It's the only kind I could find the same color of in a whole pack. It worked great and much better priced then card stock! When I was all done, I took the wreath outside and sprayed it with some red glitter adhesive. You can't see it well in the pictures but it gives it the perfect amount of shine.

Linking to:
All things related
Somewhat Simple

Tuesday, January 18, 2011

Look What I Made! Kids Art Display

Since my little one started nursery almost 6 months ago she has been bringing home the sweetest coloring pages! I've been seeing some fun ideas to display kids art, here is my version!


Here's how I made this:

I have a few of these wood boards in my garage that I got from my neighbors trash a while back. They measure 24''x7''. I got one out and gave it a nice coat of paint.

I downloaded a free font from dafonts.com that looked like cute kids handwriting, then I used my silhouette to cut the vinyl. I also thought of doing "art gallery" but I decided "look what I made" was more fun. If anyone wants me to cut vinyl for them, I charge $4.00 for the saying in this general size.
I got some wooden clothespins I had laying around and traced them on some scapbook paper, using colors that matched our play/tv room. Then I just cut out the paper and modge podged it onto the clothespins.
I added the hardware to the back of my project before I glued the clothespins on

Then I kind of eyeballed where to put the clothespins and used hot glue to glue them on.


Linking to:
Todays Creative Blog
ABC and 123
All Things Related
Sugar Bee
My Backyard Eden
Blue Cricket Design
Sister Stuff
Somewhat Simple

Monday, January 17, 2011

Crepe Paper Rose Heart

Using THIS tutorial to make the crepe paper roses, I made this to add to my small (but growing) collection of Valentine decor.

Sorry the picture isn't even straight or even decent quality! I really need to get a clue when it comes to photography!
(those wooden blocks were at target for $2.50)

I got the frame from the DI for 50 cents, the scrapbook paper I had on hand (thanks Shaela) and the crepe paper came from the dollar store. $1.50 for the total cost.

I just took out the glass in the frame made the roses until I had enough for the heart and hot glued them onto the paper which I had already cut and modge podged to the back of the frame. Easy!

Using the same tutorial, I also made this wreath for my daughters door. I got the wreath at the dollar store and used 2 rolls of crepe paper @ 50 cents each from the dollar store. $2 for the total cost, but it was a little time consuming!

Saturday, January 15, 2011

Tutu Tutorial

I did a guest post a while back on my friend Kirstikoos blog. I thought sharing the tutorial on my own blog would be a good way to kick off posting again! Enjoy!

This is a very simple tutorial for a cute poofy ballerina tutu!


Tutus are super fun for little girls! My 23 month old LOVES to prance around in them!

I included lots of pictures because I am a very visual learner! I tried to be extra clear on everything but if you have any questions please don't hesitate to ask!

You will need:

♥ About 18'' sewn elastic for the waist (this fits 6 months to about 8 years)

♥ 4 or 5 yards of tulle (I get mine at wal-mart for $1 a yard.) Get as many colors as you want!

♥ A good pair of scissors

For this tutu, I used 2 yards of black and 3 yards of pink. The first step is to unfold your tulle (not all the way, just so it looks like it was freshly cut from the bolt). Then cut into separate yards. So I cut my black right down the middle and my pink into 3rds. You could also just ask the fabric cutter to cut each yard separately for you when you buy it!

After that you need to turn your pieces long ways... like the picture on the left. The fold should be on either the right or left NOT top or bottom. So in the picture, the one on the left is CORRECT, the one on the right below my doggie is WRONG.

Take your yards and roll each one of them up like the tulle on the left.

Your tulle should be all rolled up now like the picture shows. One roll per yard.

Then, cut a little off each end of your rolls and discard. This gets rid of the fold on the one side, and makes everything nice and even.

Then cut each roll of tulle into 5 or 6 inch pieces. It doesn't have to be perfect, tutu's are a very forgiving craft!

You should end up with several small rolls like these.

Then unroll your little rolls, you will have two long strips from each roll. Cut right down the middle (making 4 strips), do this with each roll. Now you are ready to make your tutu!

This part is hard to explain but hopefully will make sense. Take one of your strips and fold it down the middle. Lay your elastic on top of your strip, close to the center fold (should be a loop) at the top. Take your two ends at the bottom and put them through the loop, the elastic should be in the middle of the loop and two ends. Pull it tight.

It should look like this, if the elastic folds in half, it doesn't matter. It wont end up showing!

Keep adding your strips in the pattern you want. For this tutu I did 2 pinks then 1 black repeated. Be sure to keep the strips close together so you can make your tutu really poofy!

Your done!! Wasn't that easy???


I'm Back!

I know I have seriously neglected this blog for the past year! Last March, a month after my daughters first birthday, we were very blessed and fortunate to be placed with a sweet baby boy. Two kids, 13 months apart makes little time for crafting, but now I feel like I'm getting the hang of things and I am in serious craft mode again! The silhouette I got for Christmas is definitely a major factor in my motivation! I'm not sure if anyone still reads this blog but I am planning on posting lots more now!! Stay tuned!

Thursday, February 4, 2010

Fabric Rolled Roses


These are so fun, quick, and easy! You can make just about any kind of accessory with them. Tonight I made this simple necklace for me and I think tomorrow I will do some hair clips for Eden! Alayne Studio has a great tutorial HERE.

Sunday, January 24, 2010

Young Women's Personal Progress Neckalce


To help encourage our girls to do their personal progress we came up with an idea to hand stamp each of the values on washers for necklaces, and as the girls pass off each value they will get that value added to their necklace. Using sharpies we colored each value the color associated with it.

To learn how to hand stamp washers go to this tutorial here.
If you have problems getting the left over marker off your washer with just a baby wipe an alcohol pad works great!!

We made the washers look styling by weaving them through ribbon with this tutorial here


The girls love the necklaces, and hopefully this will get them excited and motivated to continue to work on their personal progress!

Friday, December 18, 2009

The high chair cover

Today I felt the urge to make something other then hair bows! I looked over my list (below) and picked the one I wanted most, of course it also seemed to be the hardest! The high chair cover. I read the tutorial found here very carefully. I felt I knew pretty much how to do everything it described except I had no idea what bias tape was or what to do with it exactly. Luckily a lady at Joanns knew just what it was and she gave me all kinds of good info on the stuff! Anyway, you all know I am a beginner sewer so if anyone else wants to make this go for it! If I can do it you can too!

Before:
Do you see why I wanted a new one?

After:
I simplified the tutorial a little by just using one piece of fabric for the front, I was too scared to cut up my original cover in case things didn't work out and doing it this way I didn't have to cut it! I love this fabric! I have a girl but those colors match the room we keep our high chair in so it works.

Saturday, December 5, 2009

My List Of Things To Make (or try to)

There are so many fun crafty tutorials out there! Thank you craft geniuses for inspiring me! I recently started bookmarking all the neat things I want to try to make. Some are simple and some may take me a few times to get it right but I really want to at least try to make everything on my list! Here are just a few of my favorites so far...

Teether Toy By Patchy Apple

Mod Podge Memory Game by Green Apple Orchard

Fabric Magnets by Make it and Love it

Industrial Strength Jewelry By Crafting Chicks

Play Makup for Little Girls By Not So Idle Hands

Super Cute Headband By Foofangle

Easy as Cinch Little Kid Bag By Make it and Love it

Cute Stuffed Animals By Make it and Love it


Fun Monogram Bags By Crafting Chicks

High Chair Cover By Make it and Love it

Monday, October 19, 2009

Dollar Store Hedgehog

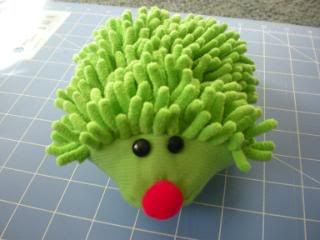
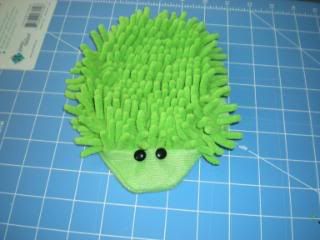
I saw this super cute idea a while back and just got around to trying it out! It's a hedgehog made from a car washer mitten from the dollar store! I looked and looked and could not find the original tutorial to link to so I did my own tutorial. If this was your idea please let me know so I can link to you!!

Update: Here is where I found the idea and from there you can get to the original tutorial. Enjoy!

To make your hedgie you will need
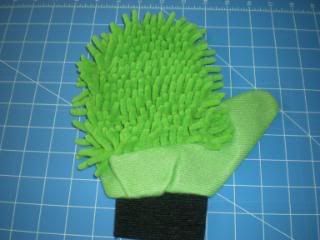
-1 car washer mitten from the dollar tree
-two buttons for eyes
-1 pom pom for nose
-batting
First take your car washer mitten and....

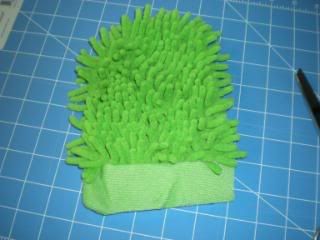
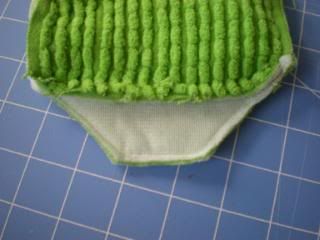
Cut the black part off as well as the thumb, you will want to leave a little extra material when cutting the thumb so you will be able to sew it shut when the time comes

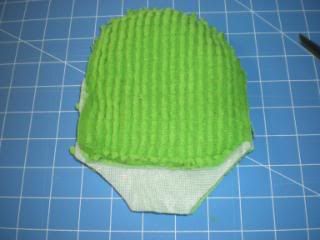
Turn your mitten inside out and cut two diagonal lines as shown below

Sew it using your machine lining it up with the foot. Do not sew the thumb hole shut yet!

Very carefully turn it right side out through the thumb hole and sew the eyes on

Stuff with batting and hand sew the thumb hole shut. Sew on the nose securely! TaDa! You have a super cute, easy, hedgehog for a dollar!

Monday, October 12, 2009

Cute Spider Decorations

These are fun Halloween decorations that your kids can easily make! You just need black fuzzy... I think they are called pipe cleaners? Well anyway you know what mean by the photos! And if you want them to be super cute, you will need some google eyes and hot glue! They are very easy to make:
Take 4 pipe cleaners and line them up next to each other
Bend them all the way around at the middle (kind of twist like a twisty tie)
Arrange the legs, make a knee and foot for each leg
Glue on google eyes if desired!
Decorate!
On lamps


Outside

Without google eyes for extra creepiness!