


Saturday, May 23, 2009
Easier way to do flower clips
If you have any brass "brads" handy you can use them to hold your flowers together. You will still need to glue something pretty in the middle of your flower. The great thing about the brads is you can switch the flowers around the way you like. Also, you can even use the brad to hold the alligator clip in place making it so you wouldn't have to buy a lot of clips. I saw the brads at office max, 100 ct for 3.24. I chose not to get them since I already have a lot of clips and glue sticks, but it would be worth if for someone just starting out.
Thursday, May 21, 2009
Korker Bow Tutorial
Ever since February this year, when my husband and I adopted our sweet baby girl, I have been making hair bows left and right for her! She looks adorable in them! I, like most of you, am a thriftaholic! I refuse to pay full price for anything unless I absolutely have to! That is why bow making — instead of bow buying — is a must in our home! I recently learned how to make the "korker" bow. They are easy and fun to make and absolutely adorable on any little girl!
You Will Need: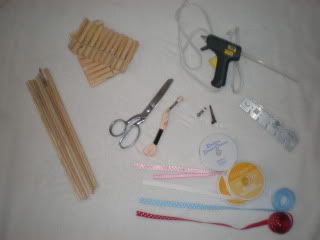 Wooden Dowels: They should each be around 1/4" thick and around 10" long. You can purchase your dowels at Walmart or use pencils instead. But if you choose to use pencils, your curls will not be as tight.
Ribbon: The best is grosgrain, and it should be around 3/8" wide. Korkers use more ribbon then most bows. Michaels always has lots of ribbon for a dollar; just make sure each spool has at least 9 feet. Michaels also always has a 40% off one item coupon in their ad each week, so be sure to use it! Also, I love checking my local Craigslist for people selling unwanted ribbon. Check the garage sale section, and search ribbon. I have been very lucky in doing that!
Wooden Clothespins: I got 36 of them at the dollar store, which is plenty!
Cookie Sheet and Oven
Scissors and Ruler
Clear Nail Polish
Needle and Thread: I use embroidery floss for a tighter hold.
Alligator Clip/Barrett/French Clip: For the best deal, get your clips on Ebay. Sallys Beauty Supply also has them, as well as CVS.
Hot Glue
To Make:
Preheat your oven to 275 degrees.
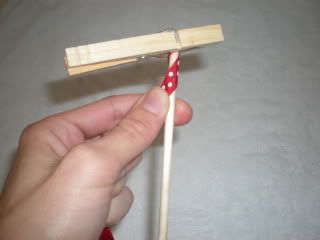
First, you have to make your korker ribbon. To do this, clip the end of the ribbon to your dowel with a clothespin and wrap the ribbon around it by twirling the bottom of the dowel. Once you've reached the end of the dowel, clip a clothespin on and cut the end of the ribbon.
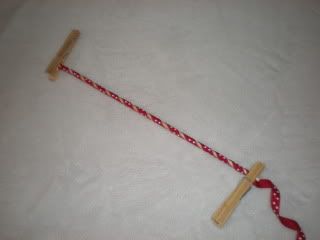
To make one decent sized korker bow you need to fill at least 3 dowels. 4 would be even better, it just depends on how big you want it. For my 3-month-old, I usually use 3-4 dowels per bow, but she is still tiny. For an older child you may want to use 5 or 6. So fill up as many dowels as you want, depending how many korkers you want to make.
When you are finished rolling your dowels, cover a cookie sheet with tin foil, (to prevent the ribbon from getting dirty) set your dowels on the cookie sheet and bake in the oven at 275 degrees for 25 minutes.

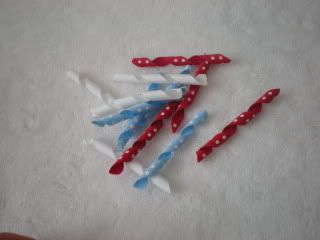
When your ribbon is done cooking, take them out and let them cool for about 5 minutes. Unwrap them, and you should have wonderful looking korker ribbon!
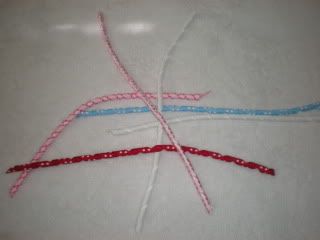
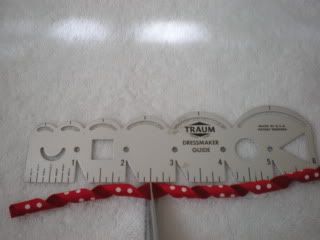
Using the ruler, you're going to want to cut your ribbon into 2 1/2"-3 1/2" pieces. Make sure whatever size you choose they are all the same. Once all the pieces are cut, brush some clear nail polish on all the edges to prevent fraying.
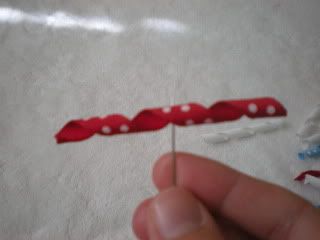
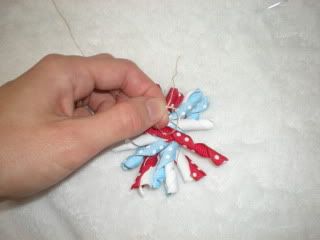
Now comes the fun part. Take your needle and thread and tie a knot in the end of the thread, leaving about 2 inches to spare.

Take all the korker pieces you want for one bow and thread the pieces on the needle in the patten your want. Make sure you are sticking the needle in the middle of the ribbon.
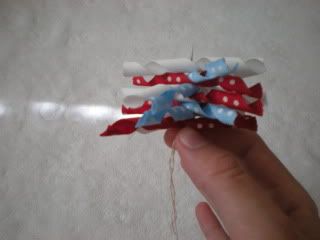
Pull all the korker pieces down to the knot all at once. Then string the ribbon back through the middle making sure not to go through the same hole. It's actually easier to hold the ribbons, pinching the middle while doing this last step. I just couldn't do it that way while taking the picture.

Tie the two ends of the string together in a double knot.
 Fluff the ribbon, glue the bow to your Barrett/clip on the back and attach it to a crochet headband or in the child's hair!
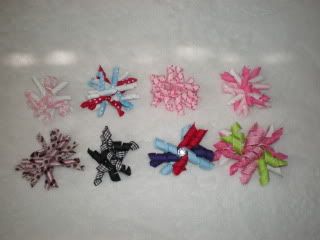 The bottom two on the right were made with pencils.
You Will Need:
Wooden Dowels: They should each be around 1/4" thick and around 10" long. You can purchase your dowels at Walmart or use pencils instead. But if you choose to use pencils, your curls will not be as tight.Ribbon: The best is grosgrain, and it should be around 3/8" wide. Korkers use more ribbon then most bows. Michaels always has lots of ribbon for a dollar; just make sure each spool has at least 9 feet. Michaels also always has a 40% off one item coupon in their ad each week, so be sure to use it! Also, I love checking my local Craigslist for people selling unwanted ribbon. Check the garage sale section, and search ribbon. I have been very lucky in doing that!
Wooden Clothespins: I got 36 of them at the dollar store, which is plenty!
Cookie Sheet and Oven
Scissors and Ruler
Clear Nail Polish
Needle and Thread: I use embroidery floss for a tighter hold.
Alligator Clip/Barrett/French Clip: For the best deal, get your clips on Ebay. Sallys Beauty Supply also has them, as well as CVS.
Hot Glue
To Make:
Preheat your oven to 275 degrees.
First, you have to make your korker ribbon. To do this, clip the end of the ribbon to your dowel with a clothespin and wrap the ribbon around it by twirling the bottom of the dowel. Once you've reached the end of the dowel, clip a clothespin on and cut the end of the ribbon.
To make one decent sized korker bow you need to fill at least 3 dowels. 4 would be even better, it just depends on how big you want it. For my 3-month-old, I usually use 3-4 dowels per bow, but she is still tiny. For an older child you may want to use 5 or 6. So fill up as many dowels as you want, depending how many korkers you want to make.
When you are finished rolling your dowels, cover a cookie sheet with tin foil, (to prevent the ribbon from getting dirty) set your dowels on the cookie sheet and bake in the oven at 275 degrees for 25 minutes.
When your ribbon is done cooking, take them out and let them cool for about 5 minutes. Unwrap them, and you should have wonderful looking korker ribbon!
Using the ruler, you're going to want to cut your ribbon into 2 1/2"-3 1/2" pieces. Make sure whatever size you choose they are all the same. Once all the pieces are cut, brush some clear nail polish on all the edges to prevent fraying.
Now comes the fun part. Take your needle and thread and tie a knot in the end of the thread, leaving about 2 inches to spare.
Take all the korker pieces you want for one bow and thread the pieces on the needle in the patten your want. Make sure you are sticking the needle in the middle of the ribbon.
Pull all the korker pieces down to the knot all at once. Then string the ribbon back through the middle making sure not to go through the same hole. It's actually easier to hold the ribbons, pinching the middle while doing this last step. I just couldn't do it that way while taking the picture.
Tie the two ends of the string together in a double knot.
Fluff the ribbon, glue the bow to your Barrett/clip on the back and attach it to a crochet headband or in the child's hair!The bottom two on the right were made with pencils.Wednesday, May 20, 2009
Cover it up!
I love covering things with fabric remnants/ribbon/paint! Some of my favorite things to cover are cardboard boxes for storing things. I always check the local thrift stores for fabric and I have been quite lucky!! I have found yards of several kinds of fabric bundled together for a dollar!
Here is a cardboard box I covered with some fabric from the thrift store, it's a nice for storing toys and fits perfectly under the crib!

My baby ended up with a TON of recieving blankets, she has outgrown them all anyway so I used a few of the ones that match her bedroom to cover up..
a thrift store storage box
 and some shoe boxes
 I know many of you have seen these wipe cases, they were pretty fun to make and easy. I use this tutorial HERE.
The one on the top was made with thrift store fabric and the one of the bottom was made with part of a receiving blanket!
 This lamp was purchased at the thrift store for 2 dollars. It was just a plain, wood lamp when I brought it home. I wish I would have taken a before picture. After a some paint, ribbon, and little wooden circles, it was a perfect fit for the nursery!
 We have built ins in our master closet so instead of crowding up our bedroom with a dresser we put those built ins to good use! I could not get myself to purchase storage bins for our socks and underwears however! They are too expensive when you need 4 of them! I of course got some cardboard boxes and covered them up with fabric and old sheets. Hot glue is one of my best friends!


Here is a cardboard box I covered with some fabric from the thrift store, it's a nice for storing toys and fits perfectly under the crib!

My baby ended up with a TON of recieving blankets, she has outgrown them all anyway so I used a few of the ones that match her bedroom to cover up..
a thrift store storage box
 and some shoe boxes
 I know many of you have seen these wipe cases, they were pretty fun to make and easy. I use this tutorial HERE.
 The one on the top was made with thrift store fabric and the one of the bottom was made with part of a receiving blanket!
 This lamp was purchased at the thrift store for 2 dollars. It was just a plain, wood lamp when I brought it home. I wish I would have taken a before picture. After a some paint, ribbon, and little wooden circles, it was a perfect fit for the nursery!
 We have built ins in our master closet so instead of crowding up our bedroom with a dresser we put those built ins to good use! I could not get myself to purchase storage bins for our socks and underwears however! They are too expensive when you need 4 of them! I of course got some cardboard boxes and covered them up with fabric and old sheets. Hot glue is one of my best friends!

Monday, May 18, 2009
Eden's Flower Clips
Flower clips are becoming more and more popular! They look adorable when clipped on crochet headbands for your baby, or clipped in any little girls hair! They are fun and so easy to make!
You will need:
-Hot Glue Gun
-Flowers
There is only one important thing to remember when buying your flowers, do not get the flowers from craft stores! They charge so much for them! Why pay that much when you don't have to? All the flower clips I've made have been made by flowers from the dollar store. You get several flowers for a dollar! There are different dollar stores depending on where you live, check several kinds. I have never found them at the 99 cents store but all the other ones have had them. It's so much cheaper and I think they still look great.
-Alligator Clips
The best place I've found to get your alligator clips is in bulk on Ebay. Try to find an auction that has the "buy it now" and "free shipping" options. I got 50 of them for 6.00 and that was with free shipping! If you only want to make a few clips you can get a 12 pack at Sallys, or I have even seen them at CVS. But it is much cheaper to buy in bulk.
and if you want something more dressy in the center...
-Rhinestones or you could also use different styles of buttons
For the rhinestones, use the 40% off one item coupon for Michaels that comes in your local paper, and I think it comes in the mail as well. I have actually found the Rhinestones at Michales to be cheaper then the ones at Wal-Mart, even without the coupon! And always always be sure to check your local thrift stores for any of these items. I found a giant bag of different buttons once for 50 cents!! That is what I've been using for some of my flowers!
To make the flowers:
-Take the flower apart (I usually do at least two, or you can mix and match)

-With a tiny dab, glue each piece together near the center.
-Glue your Rhinestone in the middle, if you want to keep the original center stick it back through the hole and trim the stem down so you can glue the clip on back.

-Glue your alligator clip on.
 You're Done!
Subscribe to:
Posts (Atom)
